Showing posts with label DIY's. Show all posts

13.1.13

DIY Floral Circle Skirt

Recognize this fabric? Well if you do it is from this summery tutorial I did way back in August of last year, DIY floral printed shorts. Boy, did that year just whiz by. As the new year arrives I am busy clearing out last years things, when my friend and I bought this fabric I clearly remember the shop keeper desperately trying to sell us the entire roll, 3m extra than we needed. We stood there for about 20 minutes trying to say no thank you, we don't have enough money! We barely had any pocket money left. Luckily in the end he gave the rest of it to us for free, I am sooo happy for that. Linen is the perfect circle skirt material, and I still don't have enough pocket money to go out and buy more of it. Oh the problems with being a teenager. For this DIY adventure I was inspired my a present that my mum bought me for christmas, this gorgeous Topshop dress. It is so simple, but the circleness of skirt  is incredibly flattering on any body type. I've seen many people wear circle skirts around town, it usually looks stunning.


Stuff you need:
Zipper
2m of floral linen
Sewing machine

1. Measure you waist and calculate the radius of that (correct me if I'm wrong, but I'm pretty sure that is your waist length/2pi). Fold your fabric in half horizontally and then again vertically as can be seen below. The quarter-circle labeled w needs to have the radius of your waist. L should be length you would like your skirt to be + seam allowance. Cut along these 2 lines, once you open it all up it should look like a large donut.


2. Next cut a slit to open up the donut. Seam both the outer and inner circles.


3. Fold over the open edges and seam them up.


4. Bring the 2 edges together place the zipper face down on top, mark where it ends. Making sure both edges are touching and fronts of either side are facing each other sew from the bottom of the skirt up till the mark. Then attach the zipper. I found this tutorial really helpful.


 Spin and twirl around in this new artwork. Until next time!


23.9.12

DIY Fabric Scrap Chain Bracelet

I have to admit that I am one of those freaks who cannot stand throwing fabric away, especially when it's either a funky print or lace. Those are my two major weaknesses. There is absolutely no way for me to use up all the scraps but I try my best to squeeze in a couple of projects here and there that let me save them. Chain bracelets are incredibly chic and elegant, often accompanied by embroidery thread and beads. Fabric scraps almost never look neat but juxtaposed to chain I just melt. The ruggedness just disappears, I love it.


Stuff you need:
Chain
Fabric scraps
Needle and thread

1. Use a pair of pliers to cut enough chain to fit around your wrist.


2. Cut several fabric scraps, each one should be around 1cm wide. Play with the different types of fabric. I used printed cotton, t-shirt material and lace.


3. Skip the first chain and then put the fabric through the second one.


4. Weave it through the next 5 to 6 chains. Then sew another strip of fabric to the first one.


5. Continue to weave and add the fabric to the bracelet.


6. Don't go right to the end, leave 4 to 5 chains before that. Trim and knot the excess fabric.


7. Use your pliers to secure the first chain to the last one.


Now all you fashionistas go and add this to your bracelet collection!

28.6.12

DIY Key Ring Pendant

Oh how I love staring through the glass windows of Tiffany and admiring the beautiful bajillion dollar pieces of jewelry. With their rings to bracelets to necklaces, Tiffany never fails to take my breath away. These were definitely a unique idea and I loved them. So I bought some key rings and tried to make them on my own.


If you want you could use assorted sizes and colors of key rings or you could just keep it simple like I did.


Stuff you need:
Several key rings
Necklace chain


1. Lay out the rings in the form of the pendant.


2. Begin by attaching just 2 together like you would a normal key ring.


3. Then attach the rest of the rings.


Attach to a necklace chain and wear!

p.s. Check out this post where queenoffunkydiy was featured on.

20.6.12

DIY Simple Strapless Dress

Now that summer is officially here it is the perfect time for all s's: swimming, smoothies, sunglasses and strapless dresses. This tutorial is an easy and inexpensive way to get your own strapless dress.

The result of this dress all depends on the fabric you choose. I was fortunate enough to come across an amazing summery floral while strolling through the fabric store the other day. I fell completely in love with it bought it immediatly.


Stuff you need:
1 meter of fabric
Elastic
Sewing machine (needle and thread will do)

1. Iron the fabric.


2. Measure around above your chest, under your arms. Add 10cm to this measurement. Find the center of the top of the fabric, this should also be where the center of you measurement is. Cut from the sides of the measurements to the bottom corner of the fabric. It should now form a trapezoid.


3. Fold the fabric in half and pin the sides together. Then sew them together.


4. Now fold the top of the dress inwards. The seam should be large enough for the elastic to fit inside. Sew in place and leave a gap to put the elastic through.


5. Cut the elastic so that is 7 cm shorter than the initial measurement you took at the beginning of this tutorial. Use a safety pin to pull the elastic through. Sew the 2 ends of the elastic together and close the seam.


6. Last but not least trim the dress to your desired length and fold to make a seam.


Now that you've got yourself a new basic, dress it up and have fun wearing it all through summer!

20.5.12

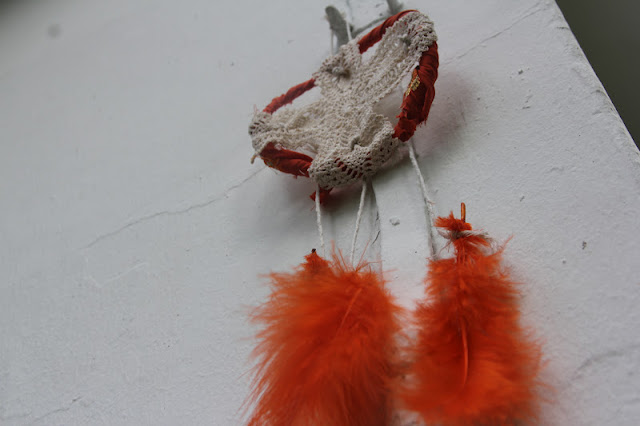
DIY Dream Catcher

The sacred native american dream catcher is used to protect children from nightmares but can now also be used as a beautiful decorative item. Personally I really love them when they are made in exceptionally bright colors rather than browns and blacks. 


Stuff you need:
Wire
Masking tape
Fabric
String
Lace Doily
Feathers

1. Cut a long piece of wire and bend it into a ring. Wrap the ring in masking tape.


2. Again cover the ring in a strip of fabric.


3. Attach the doily to the ring by weaving it around the sides using string.


4. Tie 3 strips of string to the dream catcher and tie feathers to them.


Now let your dream catcher protect you from all night mares :)

2.5.12

DIY Under Sleeve Tie-Dye Top

Tie-dying is definitely one of the best DIY activities ever created. It's fun and can be used in so many ways. Another benefit of tie-dying is that you will always be original, but that is basically a benefit from all DIY's. Tie-dye is special because you can experiment with original prints.


Stuff you need:
Plain white tee
Rubber bands
Dye

1. Collect fabric beneath the sleeve of the tee.


2. Dye the fabric then remove the neck.


This is a close-up of the print. Have fun tie-dying!


18.4.12

DIY Noodle Skirt

Even though I am not a big fan of them, my inspiration for this DIY were  frayed crop tops. I love the way the t-shirt material hangs when cut into several strips and sort of curls into a 'noodle'. I've seen many DIYers play with that technique to create necklaces, belts and all kinds of fun stuff but I wanted to do something different. So I decided to bring the frayed from the frayed crop top to the bottom half, in skirt form.


Stuff you need: 
Plain t-shirt
Jersey skirt
Needle and thread or sewing machine

1. Remove the top part of the tee and cut the rest of it into several strips at 2 cm intervals. The cutting lines are shown below.


2. Pin the strips to the skirt.


3. Sew them on. Make 2 rows of stitches to be secure.


4. You can either trim the 'noodles' or tie knots at the end of them to make them shorter.


Enjoy!


15.4.12

DIY Neon Shoelace Necklace

Forgive my new obsession with neon but how can you not love these bright colors? I know they make everyone happy. So embrace them and don't be afraid to make a bold statement with neon.


I was super excited for this DIY because when I saw these shoelaces in the store I had no idea what on earth I was going to do with them but I bought them anyways. But when I saw this Aurelie Bidermann Necklace I immediately thought of my neon shoelaces for some odd reason. I'm glad I did though.


Stuff you need:
Neon shoelace
Embroidery thread
Chain
PVA glue

1. Cut 2 lengths of your shoelace. One should be how long you want the necklace to be and the other should be 1.5 cm shorter than that.


2. Lay both pieces next to each other. Place the thread under one piece.


3. Bring it over and put it under the other.


4. Put it over and under again.


5. Repeat steps 2-4 until it looks like this.


6. Tie a knot at the back and cut the embroidery thread. Repeat steps 2-6 on the other end of the 2 pieces.


7. Remove all excess thread put glue on the ends to avoid fraying.


8. Tie the chain to both ends of the shoelace.


Apart from making this necklace another one of my accomplishments this week was making a pinterest account. Please follow it and I will try my best to follow back!