Showing posts with label Necklaces. Show all posts

28.6.12

DIY Key Ring Pendant

Oh how I love staring through the glass windows of Tiffany and admiring the beautiful bajillion dollar pieces of jewelry. With their rings to bracelets to necklaces, Tiffany never fails to take my breath away. These were definitely a unique idea and I loved them. So I bought some key rings and tried to make them on my own.


If you want you could use assorted sizes and colors of key rings or you could just keep it simple like I did.
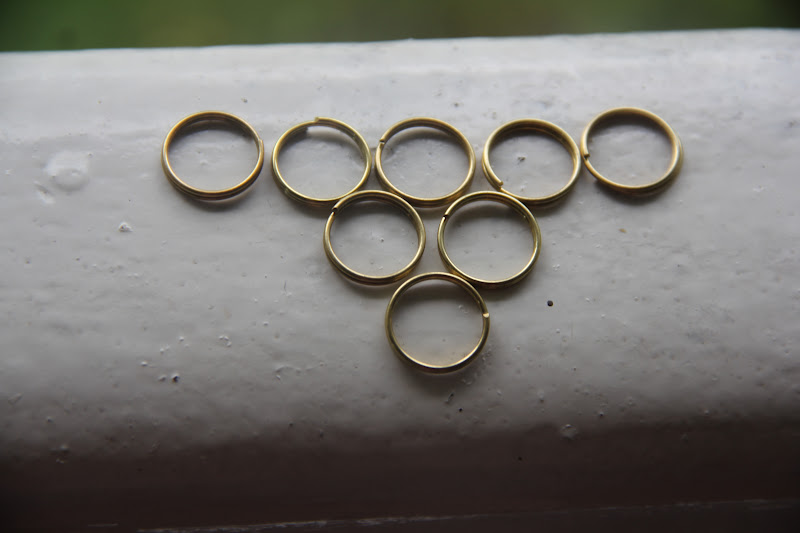

Stuff you need:
Several key rings
Necklace chain


1. Lay out the rings in the form of the pendant.


2. Begin by attaching just 2 together like you would a normal key ring.


3. Then attach the rest of the rings.


Attach to a necklace chain and wear!

p.s. Check out this post where queenoffunkydiy was featured on.

15.4.12

DIY Neon Shoelace Necklace

Forgive my new obsession with neon but how can you not love these bright colors? I know they make everyone happy. So embrace them and don't be afraid to make a bold statement with neon.


I was super excited for this DIY because when I saw these shoelaces in the store I had no idea what on earth I was going to do with them but I bought them anyways. But when I saw this Aurelie Bidermann Necklace I immediately thought of my neon shoelaces for some odd reason. I'm glad I did though.


Stuff you need:
Neon shoelace
Embroidery thread
Chain
PVA glue

1. Cut 2 lengths of your shoelace. One should be how long you want the necklace to be and the other should be 1.5 cm shorter than that.


2. Lay both pieces next to each other. Place the thread under one piece.


3. Bring it over and put it under the other.


4. Put it over and under again.


5. Repeat steps 2-4 until it looks like this.


6. Tie a knot at the back and cut the embroidery thread. Repeat steps 2-6 on the other end of the 2 pieces.


7. Remove all excess thread put glue on the ends to avoid fraying.


8. Tie the chain to both ends of the shoelace.


Apart from making this necklace another one of my accomplishments this week was making a pinterest account. Please follow it and I will try my best to follow back!


12.2.12

DIY Juan Carlos Obando Inspired Necklace

Juan Carlos Obando = Genius.
He paired these bold, vibrant necklaces with beautiful dresses and delivered fantastic results. I can imagine these necklaces being worn to excite any old outfit or to accompany an amazing one. Either way I know it will look great.


Stuff you need:
Pantyhose 
Bright colored fabric
Large round beads
Needle and thread

1. Cut off both legs of the panty hose and stretch them out till they are as long as possible. I made this contraption using 6 jars and stretched them for 4 hours so they would stay long.


2. Put your beads in one of the panty hose legs.


3. Make sure all of the beads are in the middle of the pantyhose and tie a knot before and after each bead.


4. Cut the fabric so that it is about 15 cm by however long you beads are.


5. Roll up the fabric and sew in place. Also sew the sides closed. Try to fold the fabric inwards when you sew so that the frayed edge does not show.


6. Knot the other pantyhose leg on one end.


7. Wrap it around and knot at the other end. Remove excess.


Now that is what I call a funky DIY.


8.1.12

DIY Braided Rope Necklace

My new 2nd favorite show (Castle is first) is Jane By Design and I have only seen 1 episode! Maybe it's only because Jane says she makes her own clothes, or because of the exaggerated high school drama's, or because of the necklace in the photo below that I took a screen shot of while watching the show. 

Don't you just love this necklace? I definitely do. As soon as I saw it in the show I knew I had to make it. The combination of rope and beads just goes so well together.

My version:


Stuff you need:
6 x 110 cm Long Rope
Glue
String of Beads
2 Clips

1. Organize your string of beads and rope as shown below. Make sure your rope is separated into 2 groups of 3. Knot at either end of each set of rope. Make sure one set of rope extends above the string of beads and other extends below. 


2. Braid the string of beads and 2 sets of rope together. Clip at either end.


3. Undo the knots on the longer ends of the ropes. Separate them each of them as shown below:


4. Cut off the excess from the shorter ends.


5. Use the single ropes to wrap around at either of the braid. Glue to hold in place then remove excess from the single ropes.


6. Clip to hold in place while the glue is drying.


I am quite satisfied with my necklace, now DIY!


7.12.11

DIY Ruffled Necklace

I thought this would be an incredibly funky DIY:


I found it in my look book. What is my look book? It's where I keep pages and photos that I love from fashion magazines, catalogues, the internet etc. Every DIYer needs a look book. It is a necessity.

Here is the result:

Stuff you need:
Fabric
Chain
Needle and thread

1. Cut a strip of fabric that is 5 x 90 cm long.

2. Begin folding the fabric making sure each fold is about 2 cm wide. No need to be perfect here.


3. Once you have folded all of it thread your needle and put it through the fabric. Knot at either end.


It should end up looking like this:


4. On either end of the ruffle make a wide hole using a pin.


5. Open either end of the chain, hook them onto both holes, then close them... Ta-daa!


My mum has started a vegetable patch in the backyard and I thought I would share these lovely photos of flowers that came up instead of pumpkins. Aren't they charming? I love the orangey yellow color. Bye for now!


4.12.11

DIY Necklace From A Broken Lock

The other day I was trying to open my locker when I dropped my lock for millionth time. The only difference between this time and all the other times was that the whole lock cracked open. It was a tragic moment until I picked up the pieces.


In the mess I found these 3 darling number wheels. Don't you just love them?


For a while I was confused about what to use them for... I still am. The best thing I could think of was a pendant. Any more ideas?
Anyway the point I am trying to prove is that you can DIY with just about anything... Ta-daa!