28.12.11

DIY 3.1 Phillip Lim Inspired Sheer-Sweater Top

Apart from the comic printed sweaters, the 3.1 Phillip Lim Pre-Fall 2012 Collection appeared very subtle and conservative, but that is what makes it so versatile.

Lim repeatedly combined sweater material with sheer, giving us DIYers another easy designer inspired project.

Remove the sleeves of a sweater and replace them with the sleeves of a sheer top. Don't remove to much of the sleeve on one of the sides.

Style.com

Style.com

This one is interesting, I guess you could cut the bottom and sleeves of the sweater then layer on top of another shirt.

Style.com
I hope you all had a great christmas! Now I have to start on some new year blog resolutions for 2012... Happy new year everybody!

19.12.11

Inspiration: Dip Dye's

After seeing this at A Pair and & a Spare I have been trying to find ideas for dip dying or anything that looks similar. Aren't they charming? 

I love these gold cuffs
Tumblr

Tumblr

Kanye West
Dip dye's are super simple to do. Just dip, dye and dry. If you use 2 shades of a color, dye using the lighter one first then the darker one.
P.S. Merry Christmas!!!!!

18.12.11

DIY Little Birdie Phone Cover

Every phone deserves a cover to live in, they can't just be left naked. I know there are tons of cheap phone covers out there, but the cheapest ones are ALWAYS the clear plastic ones. After feeling incredible amounts of sympathy for my nude phone I decided to make it a little birdie cover from one of those clear plastic covers.


Stuff you need:
A small drawing or printout of something easily traceable (Of course you don't have to use a little birdie)
Clear plastic phone cover
Spray paint
Permanent marker
Masking tape

Tip: At each stage make sure to wait for the paint/marker to dry. Otherwise the image will appear smudged and messy.

1. Place the drawing or image under the cover. Make sure the inside of the cover is facing upwards.


2. Trace it with permanent marker.


3. Paint it.


4. Cover the outside in masking tape.


5. Spray paint the inside.


Peel of the masking tape. Ta-daa!


11.12.11

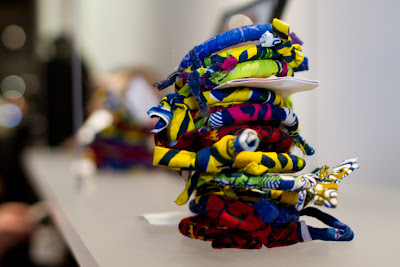
DIY Nicole Miller Inspired Textile Bangles

I first spotted these bangles in my December/January edition of Teen Vogue and knew they would be perfect for a DIY tutorial. That's why I love Teen Vogue and Vogue and almost any other fashion magazine, they are always stuffed with inspiration for DIY.


Here are the Nicole Miller versions:


And here is mine:


Stuff you need:
Wooden/plastic bangle
Long strip of patterned/printed fabric


1. Leave about 12 cm of excess fabric.


2. Wrap the fabric around the bangle.


3. Once you have finished wrapping the bangle tie a bow with the excess from the end and the beginning of the fabric.


Ta-daa!


7.12.11

DIY Ruffled Necklace

I thought this would be an incredibly funky DIY:


I found it in my look book. What is my look book? It's where I keep pages and photos that I love from fashion magazines, catalogues, the internet etc. Every DIYer needs a look book. It is a necessity.

Here is the result:

Stuff you need:
Fabric
Chain
Needle and thread

1. Cut a strip of fabric that is 5 x 90 cm long.

2. Begin folding the fabric making sure each fold is about 2 cm wide. No need to be perfect here.


3. Once you have folded all of it thread your needle and put it through the fabric. Knot at either end.


It should end up looking like this:


4. On either end of the ruffle make a wide hole using a pin.


5. Open either end of the chain, hook them onto both holes, then close them... Ta-daa!


My mum has started a vegetable patch in the backyard and I thought I would share these lovely photos of flowers that came up instead of pumpkins. Aren't they charming? I love the orangey yellow color. Bye for now!


4.12.11

DIY Necklace From A Broken Lock

The other day I was trying to open my locker when I dropped my lock for millionth time. The only difference between this time and all the other times was that the whole lock cracked open. It was a tragic moment until I picked up the pieces.


In the mess I found these 3 darling number wheels. Don't you just love them?


For a while I was confused about what to use them for... I still am. The best thing I could think of was a pendant. Any more ideas?
Anyway the point I am trying to prove is that you can DIY with just about anything... Ta-daa!


23.11.11

Inspiration: Lace

I have a new found love for lace. As I scroll down my tumblr dashboard, I can't help but to always stop at those lovely photos of lace. Here are some of those photos:
Alexa Chung from Style.com

Tumblr

Tumblr

Tumblr

Tumblr

Tumblr

Tumblr... It may not be lace, but I really loved this.
Can't wait to DIY

20.11.11

DIY Fabric Flower Ring

My inspiration: Pink flowers and sunny days. 


Ever since July of last year I have had an obsession for fabric flowers. I find them so fresh and feminine. But whenever I wore them they would always be in my hair, for a change I decided to make one in ring form. I have hundreds of floral headbands and hair clips lying around.


Stuff you need:
A ring base(I used a broken ring and stuck the flower on top)
Fabric
Paper
Needle and thread
Felt

1. Draw a flower that is the size and shape you want your ring to be and cut it our. Fold a strip of fabric 4 times and pin the flower cut out on the fabric.


2. Remove the excess fabric.


You should have four flower cut outs.


3. Fold each of them in half and half again.


4. Cut out a circular piece of felt.


5. Sew the petals onto the felt.


Add an embellishment and glue it to the ring. Tadaa!