29.10.11

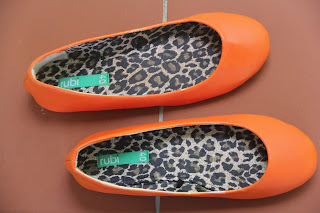
DIY Lace Flats

Saw it on tumblr. Liked it. Saved it. Altered it. DIYed it. 


I like solid bright colors... especially orange. 
Stuff you need:
Flats
Lace
Spray Paint


1. Spray paint your flats.


2. Cut out 2 strips of lace.


Glue them then stick them to your flats... Ta-daa!


23.10.11

DIY Bottega Veneta Inspired Duct Tape Pouch

Who doesn't love Bottega's classic woven design? I always have. It distinguishes Bottega from all other brands, even copies don't manage to carry it off as well as they do. I gave it try... with duct tape.


Today I found out that the duct in duct tape was spelt d-u-c-t not d-u-c-k. Oh well, we learn something new everyday don't we :)


Stuff you need:
Duct tape (TOP TIP: When cutting duct tape make a small slit where you want to cut and rip the rest of the way. You will definitely get a straight cut) 
Some sort of opening and closing contraption eg. buttons and zippers (optional)

1. Cut a strip of tape 15 cm long.


2. Cut the strip in half.


3. Carefully fold both strips in half. You will need 36 strips.


4. Weave the strips together so they look like the photo below. Use 18 strips for each one.


5. Place one on top of the other.


6. Cut a strip of duct tape the length you would like your pouch to be and seal the bottom of both pieces together.


7. Trim both the sides.


8. Seal the sides with duct tape and trim the top.


9. Cut 2 strips of duct tape. Use them to seal both sides of the top of the pouch.


I somehow managed to make a button and string contraption to close the pouch... Ta-daa!

21.10.11

DIY Vintage Hair Pins


I saw a  few pins similar to this in a store a few days ago and I loved them... but they were $25 EACH! I didn't even have that much pocket money left. So I decided to do a DIY. It took me while to figure out how to make them but I think I finally got it right.


It turned out quite nicely, elegant yet slightly imperfect... just the way I like it. That's what is so alluring about most vintage things, they may have a faded photo, a broken corner or a piece missing. With all this they still manage to charm.

Stuff you need:
Plain Hair Pin
Metal Embellishment (preferably rounded) 
Bronze/Gold Paint
A Tiny Printout Of An old Portrait (I got mine from here)
Crafting Pearls
PVA Glue

1. Start by painting your hair pin and metal embellishment bronze/gold. I found it easier to paint the pin when it was pinned to a sheet of paper, this will also make sure paint does not go in between the pin. 


2. To make the embellishment seem a little more vintage I dabbed it with a scrap of cloth. Round the edges of your tiny portrait printout and glue it in the center of the embellishment.


3. Cover the entire photo in PVA glue. This will create a layer and protect the photo. Plus it makes it look more vintage.


4. Surround it with pearls. You don't need any extra glue for this.


5. Glue the pin to the back of your embellishment. 


Ta-daa!

17.10.11

DIY Burberry Prorsum Inspired Bracelet

Burberry Prorsum.
Prorsum is Latin for ahead.
Burberry Prorsum's spring 2012 RTW collection is ahead in so many ways.

Aren't they bewitching? Every piece was conceived so brilliantly that I couldn't take my eyes off a single model Burberry Prorsum sent down the runway. I especially love the fresh use of color and pattern.
From style.com
And this is what the line inspired me to DIY...


I have always wanted to do a b&w tutorial and I thought this one looked quite cool in b&w.

Stuff you need
Fabric, Beads, Ribbons (whatever you want to use)
A strip of fake leather (do not kill animals for clothing!)
Needle and Thread

There was an old fake leather pouch lying around so I though I would rip it up and use some of it for the tutorial.


1. Choose what materials you want to use and put them together to make your bracelet. (Top tip: LAYER, LAYER, LAYER)


2. Once everything is stuck together thread a needle, knot the end and sew through one end of the bracelet. cut and repeat on the other end. 


Tie it round your wrist and ta-daa!


16.10.11

DIY 60's Style Sleeveless Shirt

These shirts make me think of summer, sun and style. The first photo is by Marc Jacobs, second is Dakota Fanning in 'The Secret Life Of Bees, and third is by Ralph Lauren. Don't they look so perfectly smart?


I didn't feel like doing a full on tutorial because it was so simple to make! I picked up a super cheap white shirt from a flea market and died it pink. Then I removed the sleeves and replaced it with some lining... Ta-daa!    


12.10.11

DIY 2 Color Pocket Tee

What's the point of shirt pockets? Old men in suits use them for handkerchiefs and pens. Apparently they were first invented so that you could keep business cards close to your heart... strange. Personally I prefer it when shirt pockets are empty, brightly colored, and worn by women.

I like the photos above way better than this, but I have to admit his mustache pretty cool.


So, it is time for yet another DIY.


The white stuff is chalk that I forgot to dust off. Whoops!

Stuff you need:
2 oversized t-shirts
Chalk
Sewing machine (needle and thread will do, but it will take 10 times longer)
Seam ripper

1. Start off with your 2 t-shirts. The pink one is A and orange, B.


2. Using a seam ripper remove the sleeves t-shirt A. Be careful not to rip the fabric.


3. Then cut off the neck of the t-shirt A.


4. Afterwards pin the raw edge of the neck inwards and sew in place. (t-shirt A)


5. On each t-shirt draw a line where you want the 2 colors to meet. On t-shirt A draw another line 4 cm below. Cut on this line. And on the t-shirt B draw a line 4 cm above. Cut on this line.


6. Next, decide how large you want your sleeve to be. You may decide to turn the fabric inwards to this. Mark it by make a line with some chalk. Draw another line 3 cm to the side. Repeat this step on both sleeves.


7. Cut on the line closer to the edge.


8. Using a seam ripper, split t-shirt B into 2 pieces of fabric.


9. Pin t-shirt B to t-shirt A so it looks like below. Then sew the fabric together.


10. Next, turn the tee is inside out and pin then sew the sides together. Make sure to leave space for the sleeves.


11. This time turn the tee the right way out. Turn the raw edge of the sleeves inwards. Pin and sew.


12. Finally, the shirt pocket. Using a piece of chalk draw a shirt pocket of your preferred size on excess fabric from t-shirt B. Draw a line around it for seam allowance. Cut it out and turn the fabric above the pocket inwards. Pin and sew.


13. Pin the pocket onto the tee and sew.


Finally! Ta-daa!